.
Welcome, [wlm_firstname] !
/
Welcome to Tell-Tale Knits – Part II of The KNIT Lessons.
Tell-Tale Knits is made up of 3 “strands”.
First, you’ll learn HOW to actually KNIT & work with fibre.
Next, you’ll learn simple & effective ways to TEACH these skills to children 7 & up. (We covered the basics of working with fibre & bringing them to children under 7 in Part I – Babes ‘n’ Yarns.)
Lastly, you’ll explore the INVISIBLE dimension – where you’ll take the time to explore the fibre arts as an exciting means of creative expression & relaxation.
.
Let’s get knitting !
Begin !
If you joined me for Part I – Babes ‘n’ Yarns – you already know that this course isn’t a conventional learning experience. It stretches far beyond the simple “how-to” step-by-step formula – the videos demonstrate the basic techniques while the projects give you some starting off points to engage your children’s interest & get them making wonderful (age-appropriate) items.
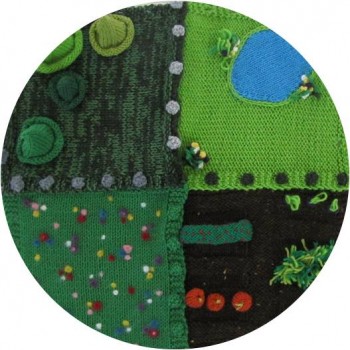
The background information provided in the printable PDFs allows you to learn more about the materials & tools you’ll be using. In this portion of the course, you’ll be delving further into the creative realm as you work on designing your own custom playscape.
We’ll also take a closer look at the whys & wherefores of teaching our children to knit & how to do it in a fun, inviting way.
A “walkthrough” of Tell-Tale Knits
,
.
What I hope this course gives you:
.
- An opportunity to come to (or back to) the fibre arts with your own “beginner’s mind”, regardless of where you are on the handwork-skills spectrum.
. - A feeling that it’s OK to allow yourself to take the time to explore the techniques, contemplate the exercises & enjoy making something beautiful for your children. (They deserve to learn from someone who really understands what they’re teaching.)
/ - A chance to connect with yourself & other creative souls – get advice, share ideas & brainstorm about your challenges.
You can send me an email anytime, if you need clarification or a bit of a moral boost. Learning to knit is like anything else you have to practice, practice, practice !
. - The understanding of WHY it makes sense to want to inspire them to think with their hands – while they engage in the act of creating. You will be amazed how working together can deepen your relationship with your kids AND help them with their academic work.
. - A deep satisfaction when you watch your child admire their own creation.
.
So how will it all work?
.
A few details ~
.
All information will be posted here on this site – www.TheMakingLessons.com .
The full course “Table of Contents” is posted on the BLACKBOARD page so that you can keep track of your progress. As you move from level to level, each page becomes available to you automatically.
The course site is password protected so that we may enjoy it privately, feel secure in posting comments & images (you can send me images to include in the gallery if you’d like !) & to ensure that only those who have enrolled will have access to the course materials.
Passwords are individual & non-transferable.
.
Tips & Tricks
(for a great learning experience)
.
SECTIONS
Every lesson is broken down into smaller Sections – that way you can read/watch/look at them in a short time – or wait until the end of the lesson & look at it all together. You pick.
TIME
The amount of time you spend on each lesson will depend entirely on you. Some lessons are a bit shorter & others will be a bit more challenging. I will post videos, exercises, forms, templates & patterns for you to really get you thinking about how you can include knitting in your children’s lives.
FOCUS
Try to set aside some time to focus ON the lesson (that means limit distractions as much as possible – like your cell, Facebook, emails coming in, children too if you can…) – you will absorb so much more if you aren’t multi-tasking.
PREP
Consider your time spent here as a little treat for yourself – so make sure you’re comfortable, have a favourite drink nearby as well as a notebook & pen. Each lesson is quite short so you can afford to sink into it before getting on with your day (or, if you’re like me – evening!)
QUESTIONS
At anytime, you can send me any questions that may have arisen for you during the lesson. Do it right away before you forget!
.
Fine Print…
I would appreciate it if you do not pin, re-post or share any course materials or images.
All content which I provide during The KNIT Lessons is copyrighted to me, Elizabeth des Roches.
Also, I will not post any of your comments, feedback or images online without your consent.
Lesson 1.1
Materials & Supplies
Click below for a detailed list of the yarns & tools that you’ll be using during this course.
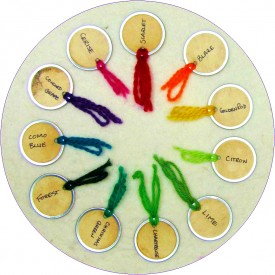
It lists the weights & (suggested – but NOT mandatory!!) colours.
You can follow page one & buy the exact colours I used or use page 2 to create your own palette. As you’ll see, many of the elements of the playscape which I created for this course did not use up an entire ball of yarn. You can choose to either buy a complete ball of every single colour OR switch colours around in your playscape to eliminate some of the colours. This is not as quick as it sounds, so if you do this – set aside enough time to think through everything you’d like to make.
***NOTE ***
If you choose the second option – pay close attention to the weights of the various yarns – each pattern is written for a specific weight & will behave differently if you substitute thicker or thinner yarns.
The third option is to buy as you go – this makes sense if you feel you might change your mind along the way or you’d like to involve your child in picking colours as seeing what you’ve made so far will help them imagine what to choose next.
Also, remember you can use up yarn you already have in your stash – just weigh it & check against the list to ensure you’ll have enough.
** In the video, I mention yarns supplied by Cedar Ring Circle. Back when I first created this course, we worked together but since then they’ve moved on to other things & unfortunately are no longer able to supply yarns for this course. **
Go to the Gallery to learn more about my most used knitting tools & supplies.
Yarn Inventory
Knitting Tools
Playscape Components
Lesson 1.2
Techniques
In this section of Lesson 1, we’ll cover the following techniques:
- Cable Cast – ON
- Knit Stitch
- Cast OFF
- Sewing, Gathering & Attaching Pieces
- Garter Stitch
- How to Make the Connectors & Buttons for your Playscape
.
Tips for Watching the Technique Videos
Before you watch each video – make sure that you have your KnitNotes Ideabook on hand so that you can make notes &/ or sketches for yourself.
.
If you are a BRAND NEW knitter :
.
If you don’t know how to knit at all – then watch the videos at least twice before you take up your needles & yarn. Then try to work along with the video- pausing (or rewinding) as often as you need.
Make note of the questions that come to mind as you’re watching /knitting.
Every question is valuable & it’s important that you’ve thought through your answer BEFORE your child asks it!
.
If you are a knitter already:
Watch the videos & take notes too – pretend you have never knit before – what points do you think would be important for you to pass on to your child as he tries knitting for the first time ?
Are there areas where you think he might be challenged ? Be prepared.
Remember, there are many tiny movements & adjustments that you naturally make with your hands as a knitter. You have to take inventory of them & be prepared to be able to explain exactly WHAT you do while you knit!
./kM
k?